|


It's not easy to hit upon successful art activities for supertots: one- and two-year-olds simply are not coordinated enough to perform intricate operations with their hands. They can't draw realistic pictures, they can't cut out shapes from construction paper, and they can't follow directions very well. What they can do is explore materials with great dedication. They'll glue for the sake of gluing, cut paper for the sake of cutting, and paint for the sake of painting. That's quite nice, when you think about it; having no pretensions whatever about making "art," they enjoy the process more than the product.
 When you begin an art project, don't make the mistake of thinking it will take the whole afternoon.Thirty minutes of clay or glue or paint is fine for supertots; then they're off to something else. If you keep the art materials handy and easy to use, art activities can be a regular part of your child's life without becoming a big deal. When you begin an art project, don't make the mistake of thinking it will take the whole afternoon.Thirty minutes of clay or glue or paint is fine for supertots; then they're off to something else. If you keep the art materials handy and easy to use, art activities can be a regular part of your child's life without becoming a big deal.
First get comfortable
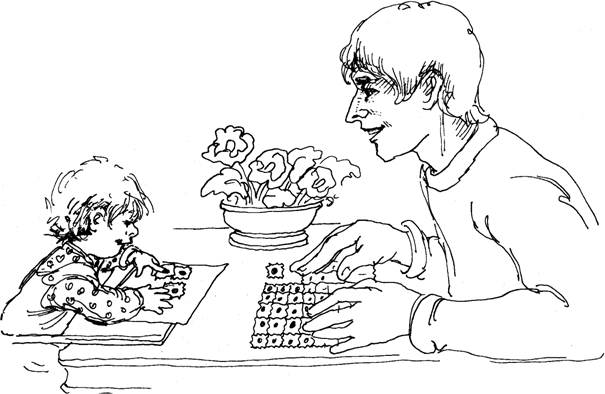
Art activities proceed best and most productively if your child is seated comfortably. Use his or her highchair
and tray for this purpose, or buy or make a child-size desk and chair. The nice thing about a highchair and
tray is that your supertot can't get out. Not that you want to force him or her to color or paint; of course
you don't, but you do want to calm your child down and help him or her concentrate. Many fidgety twos
need to be restrained in order to stop running around; they seem to operate under the principle:
where there is a way,
there is a will. Naturally, if your child really wants to run around,
you should allow this and postpone the art activity
for a quieter time.
|
|
|
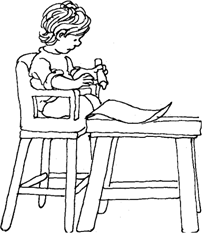
Uncomfortable: chair too high
and table too low. |
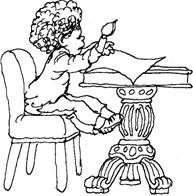
Uncomfortable: chair too low
and
table too high. |
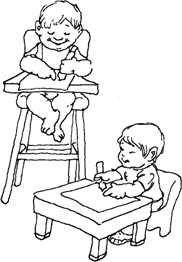
Comfortable: table and chair
just right. |
Stickers
Sometimes they come through the mail (Wildlife seals, Easter seals, Christmas seals), or you can buy them at the discount store. Supertots like to peel them and paste them on paper. Once the get used to peeling the stickers, identifying the sticky side and adhering it to the paper, they can make surprisingly nice collages to hang on the refrigerator. Make sure your child is old enough not to eat the stickers.
Some common and uncommon art supplies
| |
Crayons
Big, fat crayons are the easiest for supertots to hold. Children can start using them when they're about fifteen or sixteen months old. (Buy the fat crayons at the discount store.) Keep crayons and paper handy in the kitchen so your child can draw while you cook and do dishes.
Scribbling is about all supertots do with crayons; don't expect more. They also have a great fascination for putting crayons in and out of boxes, dropping them on the floor, trying to peel off the paper wrappings, and seeing what crayons taste like.
Be sure you have nontoxic crayons and that you teach your child not to eat them.
(This is easy to teach; simply remove the crayon each time your child puts it in his or her mouth and say: "Crayons are for coloring, not for eating"). |
|
Pencils and small pads
Keep a pencil and pad in your pocketbook for times when you need something to amuse your child. Draw little stick figures and faces, and say they are Mommy and Daddy. Your child will probably scribble on the pad too and call his or her scribbles Mommy and Daddy also. |
|
Felt-tip markers
Felt-tip markers, both fat- and thin-pointed ones, are pleasurable to young children because they produce smooth, bright lines with little pressure. Be sure to buy nontoxic, washable markers; the indelible ones leave very permanent stains on clothing. |
Roll-on deodorant jars
Pry off the ball top of an empty roll-on deodorant jar and wash the bottle out.
Fill it with tempera paint and push the
ball back on. The result? A giant
ball-point pen that paints. |
Real clay
Real clay feels good, smells good, and is somehow more satisfying to work than the commercial product known as Play-Doh. When you buy it, ask for a nonhardening, nontoxic clay that is easy to work with and can be used indefinitely. Usually you can buy it at art stores and school supply houses.
Store the clay in a tightly covered plastic or metal container along with a pair of blunt-pointed children's scissors, some toothpicks, and a couple of Popsicle sticks. Keep the clay in the room where your child is likely to use it.
Gluing things together
Some two-year-olds like this activity better than others do; they will sit for long periods happily gluing things together. They get glue on themselves; but they don't mind, and you don't have to either, as long as the glue is washable. Actually, the ones who like the activity best are usually the neatest gluers.

| |
How to get your child started
1. Put a little white glue (Elmer's or Sobo, for example) in a shallow plastic saucer.
2. Give your child a basic "bottom thing" (a newspaper, piece of cardboard or wood) to glue things onto.
3. Provide a variety of other things to glue to the "bottom thing" and to each other. Show your child
how to dip each thing into the glue and then onto the "bottom thing."
What to do with finished "collages" Save them for a day or two; then, unless you really feel attached, throw them out. You won't hurt your child's feelings. Save the best ones for the future in a box in the attic; mark your child's name and age on the ones you save. |
|
Good things to glue
scraps of paper
junk mail
ripped-up paper bags
pieces of Styrofoam
old holdiay cards
old birthday cards
old string
old wrapping paper
plastic and metal 35 mm. film cans
scraps of fabric
empty thread spools
broken shoelaces |
|
Painting with tempera (poster paint)
It can be done, but you have to be brave. Two-year-olds can paint with tempera paint and real brushes;
the question is: Can you as a parent stand the possibility of red paint on the kitchen floor?
If you don't mind cleaning it up (it's washable), proceed hopefully. If you do mind, give your child felt-tip
markers or crayons instead, and don't feel guilty. Your child will get plenty of painting experiences later
on in nursery school and kindergarten. And, as a matter of fact, painting experiences for two-year-olds do
seem to come off better in school settings anyhow. Perhaps it's because there are low, comfortable, child-size chairs and tables in school, and because teachers are more used to painting procedures than parents.
Before you rush out and buy paints and brushes, consider your child's personality and interest level. Rambunctious twos are likely to spill the paint as soon as they start and waterplay with it instead of painting. These supertots are better off with a wading pool of water and free rein. Calmer twos, however, can experience the pleasures of painting and concentrate on the activity for a surprisingly long time.
How to get a two-year-old started painting
1. Spread newspapers on the floor.
2. Dress the child in old clothes or smock. (Old clothes are more comfortable.)
3. Pour liquid, washable, nontoxic tempera paint into a few holes in a muffin tin.
Fill the holes only half full. Use only a few colors.
(Buy the paint at an art store or school supply house.
If you plan to use a lot of it, buy the powdered form; it's cheaper.)
4. Give your child a paintbrush with a short, fat handle
and fairly wide brush (at least 1/2 inch). Have one brush for each color.
5. Be ready to give your child new sheets of paper to paint on as soon
as he or she is done. Lay the finished paintings to dry
on newspaper placed on another section of the floor.
Fingerpainting

Fingerpainting is fun but messy, and some two-year-olds don't like to get paint on their hands.
Others love it with a vengeance. As with painting with tempera paint and real brushes,
don't feel you have to provide this experience for your child unless you want to.
Better not even to suggest it if you hate the mess. (Maybe you can get your teenage babysitter to like it.)
How to get a two-year-old started fingerpainting
1. Spread newspapers on the floor.
2. Dress the child in old clothes or a smock. Roll up his or her sleeves.
3. Lay fingerpainting paper down on the floor, shiny side up.
(If you don't have fingerpainting paper, use shiny white shelf paper or oilcloth.)
4. Wet the paper damply with a sponge. When your child gets older and more
experienced, he or she can do this.
5. Put a big spoonful of nontoxic fingerpaint in the middle of the wet paper.
6. Show your child how to smear the paint around with his or her hand.
Reassure him or her that it's okay to get a little messy.
7. Show your child how to do other tricks with fingerpaint: How to draw lines in it
with a finger; How to draw lines in it with a fingernail; How to make handprints
on another sheet of paper; How to make handprints in it; How to mix in other colors.
Food-coloring art
This activity also produces wasy, attractive results, but it a little messy,since the food coloring stains fingers for a while. Eventually the color wears off.
1. Fold a paper napkin any old way until it is a small folded object
2. Drip food coloring along the edges, letting your child hold the napkin while you drip, or vice versa.
Use various colors, and drip wherever you want on the napkin.
Open up the napkin. The colors will have soaked through and made a lovely design.
CLICK here for Chapter Seven: Music and Dance |